A user is someone who can use, or access your site files.
As the website owner, you decide who has permission to access your account.
First, you need to add users. To do so, click on the Add User link.
There may be charges for setting up additional users under your account. If you are unsure whether you may add an additional account, please contact the sales department.
POP (Post Office Protocol): This is an email account, a private storage location for anyone sending electronic mail. It can be accessed from any computer running a 3rd party email program such as Eudora, Outlook or Netscape. It is sometimes confusing to think of email as a level of permission, but you are still letting someone access a small piece of your account.
To retrieve mail you must use an email client such as Outlook, Eudora, or Netscape.
You will find instructions on how to set up your particular email program by clicking the appropriate program name above.
To set up a POP email account:
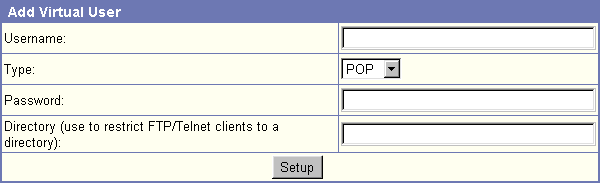
- Click on "Add User" at the top of the screen.
- For Username, put the desired e-mail name into. For example "any666" for an address any666@yourname.com
- Select "POP" as the account type.
- Enter the password you wish to assign to the username.
- Leave the directory field blank.
- Click the Setup button.
FTP (File Transfer Protocol): FTP is a method of uploading files from your computer to the server your account is located on, or downloading files from the server to your local computer.
To upload or download files using FTP, you must use an FTP client such as WS_FTP or CuteFTP. You will find instructions on how to set up your particular FTP program in Section A - Uploading Your Web Site.
To set up an FTP account:
- Click on "Add User" at the top of the screen.
- For Username, put the name to wish your user to access the account with.
- Select "FTP" as the account type.
- Enter the password you wish to assign to the username.
- If you need to limit the user to a particular directory (so they cannot change files in directories outside that one), enter the directory name. This will be relative to the /www directory, such as the following example:
Directory: /www/bob
Entry in directory field will be: /bob
If not, leave it blank.
- Click the Setup button.
Shell: Shell is SSH access. SSH is a secure method of accessing your shell account. It enables you to log into a remote host or terminal through your home pc, as though you were sitting directly at the server your account is on.
To set up an Shell account:
- Click on "Add User" at the top of the screen.
- For Username, put the name to wish your user to access the account with.
- Select "Shell" as the account type.
- Enter the password you wish to assign to the username.
- If you need to limit the user to a particular directory (so they cannot change files in directories outside that one), enter the directory name. This will be relative to the /www directory, such as the following example:
Directory: /www/bob
Entry in directory field will be: /bob
If not, leave it blank.
- Click the Setup button.
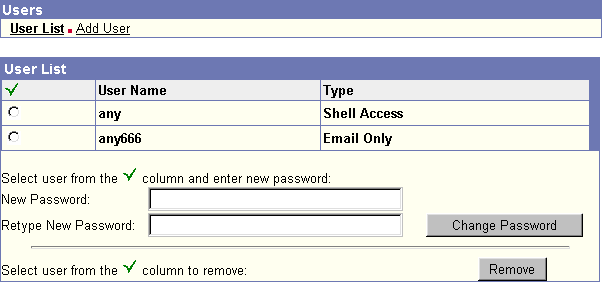
By clicking on "User List", you can easily see who you have added to your account, and what kind of permission they have. You can check off the username you wish to modify from the left hand side, and then delete or modify the password for it below.
This user list shows that 'any666' is just an email account, while 'any' has full Shell access. You can remove and add users through this interface.